written on 10/28/2018
Learn how to refactor Vue.js SFC in a real-world example
In every large Vue.js project there lies some technical debt. There are no development projects without technical debt after all. It will be there, no matter what you do.
In this article, I will guide you through how I refactor Vue.js components on a “real world application” (literally called like this). So what is this “real world application”?
I am a Vue.js enthusiast for a long time. I am using Vue.js now for more than two years and professionally I have used Vue.js for more than a year. I struggled a lot in the beginning to learn Vue.js but I orientated a lot on the official hackernews by the Vue.js team which can be found here: vuejs/vue-hackernews-2.0 - HackerNews clone built with Vue 2.0, vue-router & vuex, with server-side rendering.
Anyway, after some time, I wanted something from scratch and realworld.io was born. It is a project by Thinkster to showcase a real API integrated into frontend applications. The clue is that you can take any backend you want but also swap out every component. So you might want to go with Django + React, Golang and Vue.js or ASP.net MVC + Angular. All possible. For us, the interesting application here is the Vue.js one. You can find it here: gothinkster/vue-realworld-example-app - An exemplary real-world application built with Vue.js, Vuex, axios and different other technologies. This is a good example to discover Vue for beginners.
I am a core maintainer of this project but even in this project, there is a lot of technical debt which we need to fight. Here I will showcase different small refactorings on a Vue.js Single File component and how to make it cleaner. Below you can find the initial component and on the right the final component. It might be longer but at the end, I will explain why this is even better. So let us get started.
To get an overview of what we all did, we will start by looking at the component itself which we want to refactor. You can find the source code in the following image or you can browse it on GitHub.
1<template>2<div class="article-preview">3<rwv-article-meta :article="article" :isPreview="true"> </rwv-article-meta>4<router-link5:to="{ name: 'article', params: { slug: article.slug } }"6class="preview-link"7>8<h1>{{ article.title }}</h1>9<p>{{ article.description }}</p>10<span>Read more...</span>11<ul class="tag-list">12<li13class="tag-default tag-pill tag-outline"14v-for="(tag, index) of article.tagList"15:key="tag + index"16>17{{ tag }}18</li>19</ul>20</router-link>21</div>22</template>2324<script>25import RwvArticleMeta from "@/components/ArticleMeta";2627export default {28name: "RwvArticlePreview",29props: {30article: { type: Object, required: true }31},32components: {33RwvArticleMeta34}35};36</script>
Basically, the components use case is to show a preview of an article. Similar to what you see on the medium home page for an article. It seems like an okish component but there is space to improve. This is important to understand because what counts for a component or code base is the first impression. This component gives me the impression of weird styling and the usage of different styles. We will normalize this but also gives respect to the official Vue.js Style Guide.
1. Make imports relative
The first refactoring we are doing is to refactor the webpack alias import. The webpack alias is basically a utility given by webpack which gives the opportunity to use a string pattern for path emulation. This basically means that we can express a path with another text. In this example the @ is replacing a static path to our application. In general, this is a bad pattern because when you want to swap webpack for another module bundler the new bundler needs to supports this feature too. Since you cannot make sure that this is the case, we should remove this custom behavior and normalize it to the normal relative pattern.
1<script>2import RwvArticleMeta from "@/components/ArticleMeta";3// ...4</script>56<!-- ⚡ -->78<script>9import RwvArticleMeta from "./ArticleMeta";10// ...11</script>
2. Sort component instance options
The Vue.js style guide suggests sorting the instance options of a Vue.js Single File Component. You can look up the order on the docs page of the Vue.js Style Guide. In general, it recommends that components are listed before the props. This basically means for us that we need to resort the instance properties. The reasoning behind it is very clever and will make much more sense later. But basically, it is caused to create less confusion for the developer. In most of the times you will interact with props instead of components later like in methods , watch or computed instance properties. This is why components should be listed before props.
1<script>2export default {3name: "RwvArticlePreview",4props: {5article: { type: Object, required: true },6},7components: {8RwvArticleMeta,9},10};11</script>1213<!-- ⚡ -->1415<script>16export default {17name: "RwvArticlePreview",18components: {19RwvArticleMeta,20},21props: {22article: { type: Object, required: true },23},24};25</script>
3. PascalCase components in <template>
This is basically also given by the Vue Style Guide. Main reasons for this is that there is proper auto-completion in Editors and IDEs for PascalCased components because the compilers can distinguish between custom HTML elements and Vue.js components. This differentiation between native elements and Vue.js components gives new developers a really good sense on how to browse a code base and what to look for when looking for components. It just makes things easier.
In our example, we have one custom Vue.js component which is RwvArticleMeta . In the template, it is named <rwv-article-meta> which is not what the style guide suggests. Let us refactor this too:
1<rwv-article-meta :article="article" :isPreview="true"></rwv-article-meta>23<!-- ⚡ -->45<RwvArticleMeta :article="article" :isPreview="true"></RwvArticleMeta>
4. Self-close elements
People from other frameworks like React or Angular are joining the Vue.js hype more or less. To make this transition sweet for them make use of the JSX syntax where you can. In Vue.js it is possible to write nearly the same JSX as in React, but no one is actually using this because it is quite verbose. But some style elements like self-closing elements can be also used in Vue.js. The Vue.js template compiler makes sure that those elements are expanded after the compilation step.
You can also find a similar explanation in the Vue.js style guide. It is just nicer for new developers to join your project and will make a good first impression on the Vue.js application.
1<RwvArticleMeta :article="article" :isPreview="true"></RwvArticleMeta>23<!-- ⚡ -->45<RwvArticleMeta :article="article" :isPreview="true" />
5. Make props shorter
Sometimes, we pass boolean values to components. If those boolean values are static and truthy we can shortcut them in Vue.js Single File components. This is especially useful for components with different rendering behaviors.
1<RwvArticleMeta :article="article" :isPreview="true" />23<!-- ⚡ -->45<RwvArticleMeta isPreview :article="article" />
You just do not need to pass true to the component. Instead just pass the prop to it and it will have the default value true then.
6. Extract huge inline values
In the component, we have some bigger objects in components like in the to prop of the router-link component. Big objects like this make the reader think long because normally those objects are indented so you can actually structure them better. In this case, though you have two indentation levels it is just an inline object. To fix this behavior we can extract the object into a computed property. This makes the structure of the object clear. Also, it is not really important to understand the exact structure of the object in the template part. Instead, you should just link the part to the article which is given in the props of the component. In our example, we extracted the inline value into a variable called articleLink which is a computed property because it is using the instance prop article to generate the object. In the template part, this seems nearly as clear as before. The real structure is hidden by an implementation detail but does not disrupt the understanding of the template. Really easy refactoring but the people who are changing the structure of the template part, which will happen more often, are happy to not move around a lot of code.
Also, you can see here now why the pattern out of the second refactoring helped here. We added a new instance property which should occur at the end of the component. In this case, it is directly below props instead of components which will make it easier for the mental connection between the variables used because the computed property is using a prop directly. Otherwise, our eyes have to jump a huge distance to actually see the main property. This is causing less distraction and a nicer feeling for the developer because he thinks the component is sorted and cleaned up. Slick and easy to overview 👌
1<router-link2:to="{ name: 'article', params: { slug: article.slug } }"3class="preview-link"4>5<!-- ... -->6</router-link>78<!-- ⚡ -->910<router-link :to="articleLink" class="preview-link">11<!-- ... -->12</router-link>1314<script>15export default {16//...17props: {18article: { type: Object, required: true }19},20computed: {21articleLink() {22return {23name: "article",24params: {25slug: this.article.slug26}27};28}29}30};31</script>
7. Put every element in a proper HTML tag
In most of the cases, elements should be wrapped with the proper HTML elements. To know them all is really hard. But using a div or a span is better than using nothing in most cases. This is especially true for future development. In our component, we have a <li> element which has a text rendered which is the tag. In future scenarios, it could be that the list item needs to be extended. In a lot of cases we need to wrap the text in a span element then but then we need to write extra code because it has not been done so yet. So let us do this here now and just wrap all text elements in a span to make sure that future developers love to work with our code. Fortunately, we just have one occurrence of this pattern. In the end, this will even help us to do another refactor.
1<li2class="tag-default tag-pill tag-outline"3v-for="(tag, index) of article.tagList"4:key="tag + index"5>6{{ tag }}7</li>89<!-- ⚡ -->1011<li12class="tag-default tag-pill tag-outline"13v-for="(tag, index) of article.tagList"14:key="tag + index"15>16<span>{{ tag }}</span>17</li>
8. Use v-text instead of mustache syntax
This refactoring is also not given in the Vue.js Style Guide. It is basically a simple pattern which will make sure that your component stays universally usable.
Moustache syntax is what most developers are used to. Angular and Handlebars are using the same syntax more or less and it will be quite easy for new developers to understand. A big difference is that for people using Vue.js directly in the browser this mustache syntax might occur with weird behaviors because the curly braces are rendered if the value is not given yet. This can happen if you make HTTP requests to fetch data and is causing a bad user experience. With v-text , this can be circumvented. It also gives us the opportunity to self-close more elements which are generally recommended if you want to attract the JSX community. In our component, we have three occurrences of this pattern which we can refactor. All of those elements can be self-closed too which is really great and what we should also do. What I also generally recommend is to use v-text just on text elements like <span>, <h1>, <h2> or <p> elements. This is caused by the correlation of v-text and text elements in HTML which should be bound together somehow. Otherwise, it is causing more confusion than a clear mind. This is also the reason why we did the refactoring in step 7, just to make sure that we can do this refactoring here in a clear way.
1<router-link :to="articleLink" class="preview-link">2<h1>{{ article.title }}</h1>3<p>{{ article.description }}</p>4<span>Read more...</span>5<ul class="tag-list">6<li7class="tag-default tag-pill tag-outline"8v-for="(tag, index) of article.tagList"9:key="tag + index"10>11<span>{{ tag }}</span>12</li>13</ul>14</router-link>1516<!-- ⚡ -->1718<router-link :to="articleLink" class="preview-link">19<h1 v-text="article.title" />20<p v-text="article.description" />21<span>Read more...</span>22<ul class="tag-list">23<li24class="tag-default tag-pill tag-outline"25v-for="(tag, index) of article.tagList"26:key="tag + index"27>28<span v-text="tag" />29</li>30</ul>31</router-link>
9. Format the code of the component
Most components are not formatted right in the template part. This is because prettier cannot format the HTML part of Vue.js components yet. There is an open Pull Request though, which will add support for this. I am really looking forward to this but right now we need to format the component manually. Mostly it is restructuring the code to a more vertical format instead of horizontal. Most of the time the human likes to read from top to bottom with just some words or key elements in the code. This gives the reader of the code the feeling that he has read the component and also makes sure that you should keep your components small. So let us first restructure the template part in this component to conform to the prettier style.
1<router-link :to="articleLink" class="preview-link">2<h1 v-text="article.title" />3<p v-text="article.description" />4<span>Read more...</span>5<ul class="tag-list">6<li7class="tag-default tag-pill tag-outline"8v-for="(tag, index) of article.tagList"9:key="tag + index"10>11<span v-text="tag" />12</li>13</ul>14</router-link>
10. Extract components
In the last step, we refactored the structure of the template part of the component. Our component is growing in size though with every refactoring. We can circumvent this though by splitting out special template parts into own components. In this example, we have a tag list which has nothing directly to do with the article preview component. This is a perfect example for a refactor into an external component. This is even a functional component because it is just rendering props and does not have to manage any state which is more preferred for simple components.
1<template>2<ul class="tag-list">3<li4class="tag-default tag-pill tag-outline"5v-for="(tag, index) of tags"6:key="tag + index"7>8<span v-text="tag" />9</li>10</ul>11</template>1213<script>14export default {15name: "TagList",16props: {17tags: Array18}19};20</script>
The only thing we now need to do is to integrate the component into our main component.
1<router-link :to="articleLink" class="preview-link">2<h1 v-text="article.title" />3<p v-text="article.description" />4<span>Read more...</span>5<ul class="tag-list">6<li7class="tag-default tag-pill tag-outline"8v-for="(tag, index) of article.tagList"9:key="tag + index"10>11<span v-text="tag" />12</li>13</ul>14</router-link>1516<!-- ⚡ -->1718<router-link :to="articleLink" class="preview-link">19<h1 v-text="article.title" />20<p v-text="article.description" />21<span>Read more...</span>22<TagList :tags="article.tagList" />23</router-link>2425<script>26import TagList from "./TagList";2728export default {29components: {30// ...31TagList32}33};34</script>
This makes the template part even shorter which is again preferred because if we want to change the structure of the component which is more common than changing the logic of the component is now really easy to do.
11. Improve props
Now there is a last refactoring to do. Sometimes we compute much more than we need to do actually. In our newly created TagList component there is a list rendered with Vue.js. v-for rendered elements in Vue.js require a key though. This key should be unique. If the list of elements you iterate through does not have a unique property you should iterate with an index. But in the key, you just need to use the index then to avoid additional computation. In our example, this is some technical debt given here which we can improve by just deleting the computation and putting the index as a key alone.
1<li2class="tag-default tag-pill tag-outline"3v-for="(tag, index) of tags"4:key="tag + index"5>6<span v-text="tag" />7</li>89<!-- ⚡ -->1011<li12class="tag-default tag-pill tag-outline"13v-for="(tag, index) of tags"14:key="index"15>16<span v-text="tag" />17</li>
12. Profit
We are done. The refactoring is finally done 🙌
You can see the whole refactoring in the following screenshot or in the Pull Request which I created.
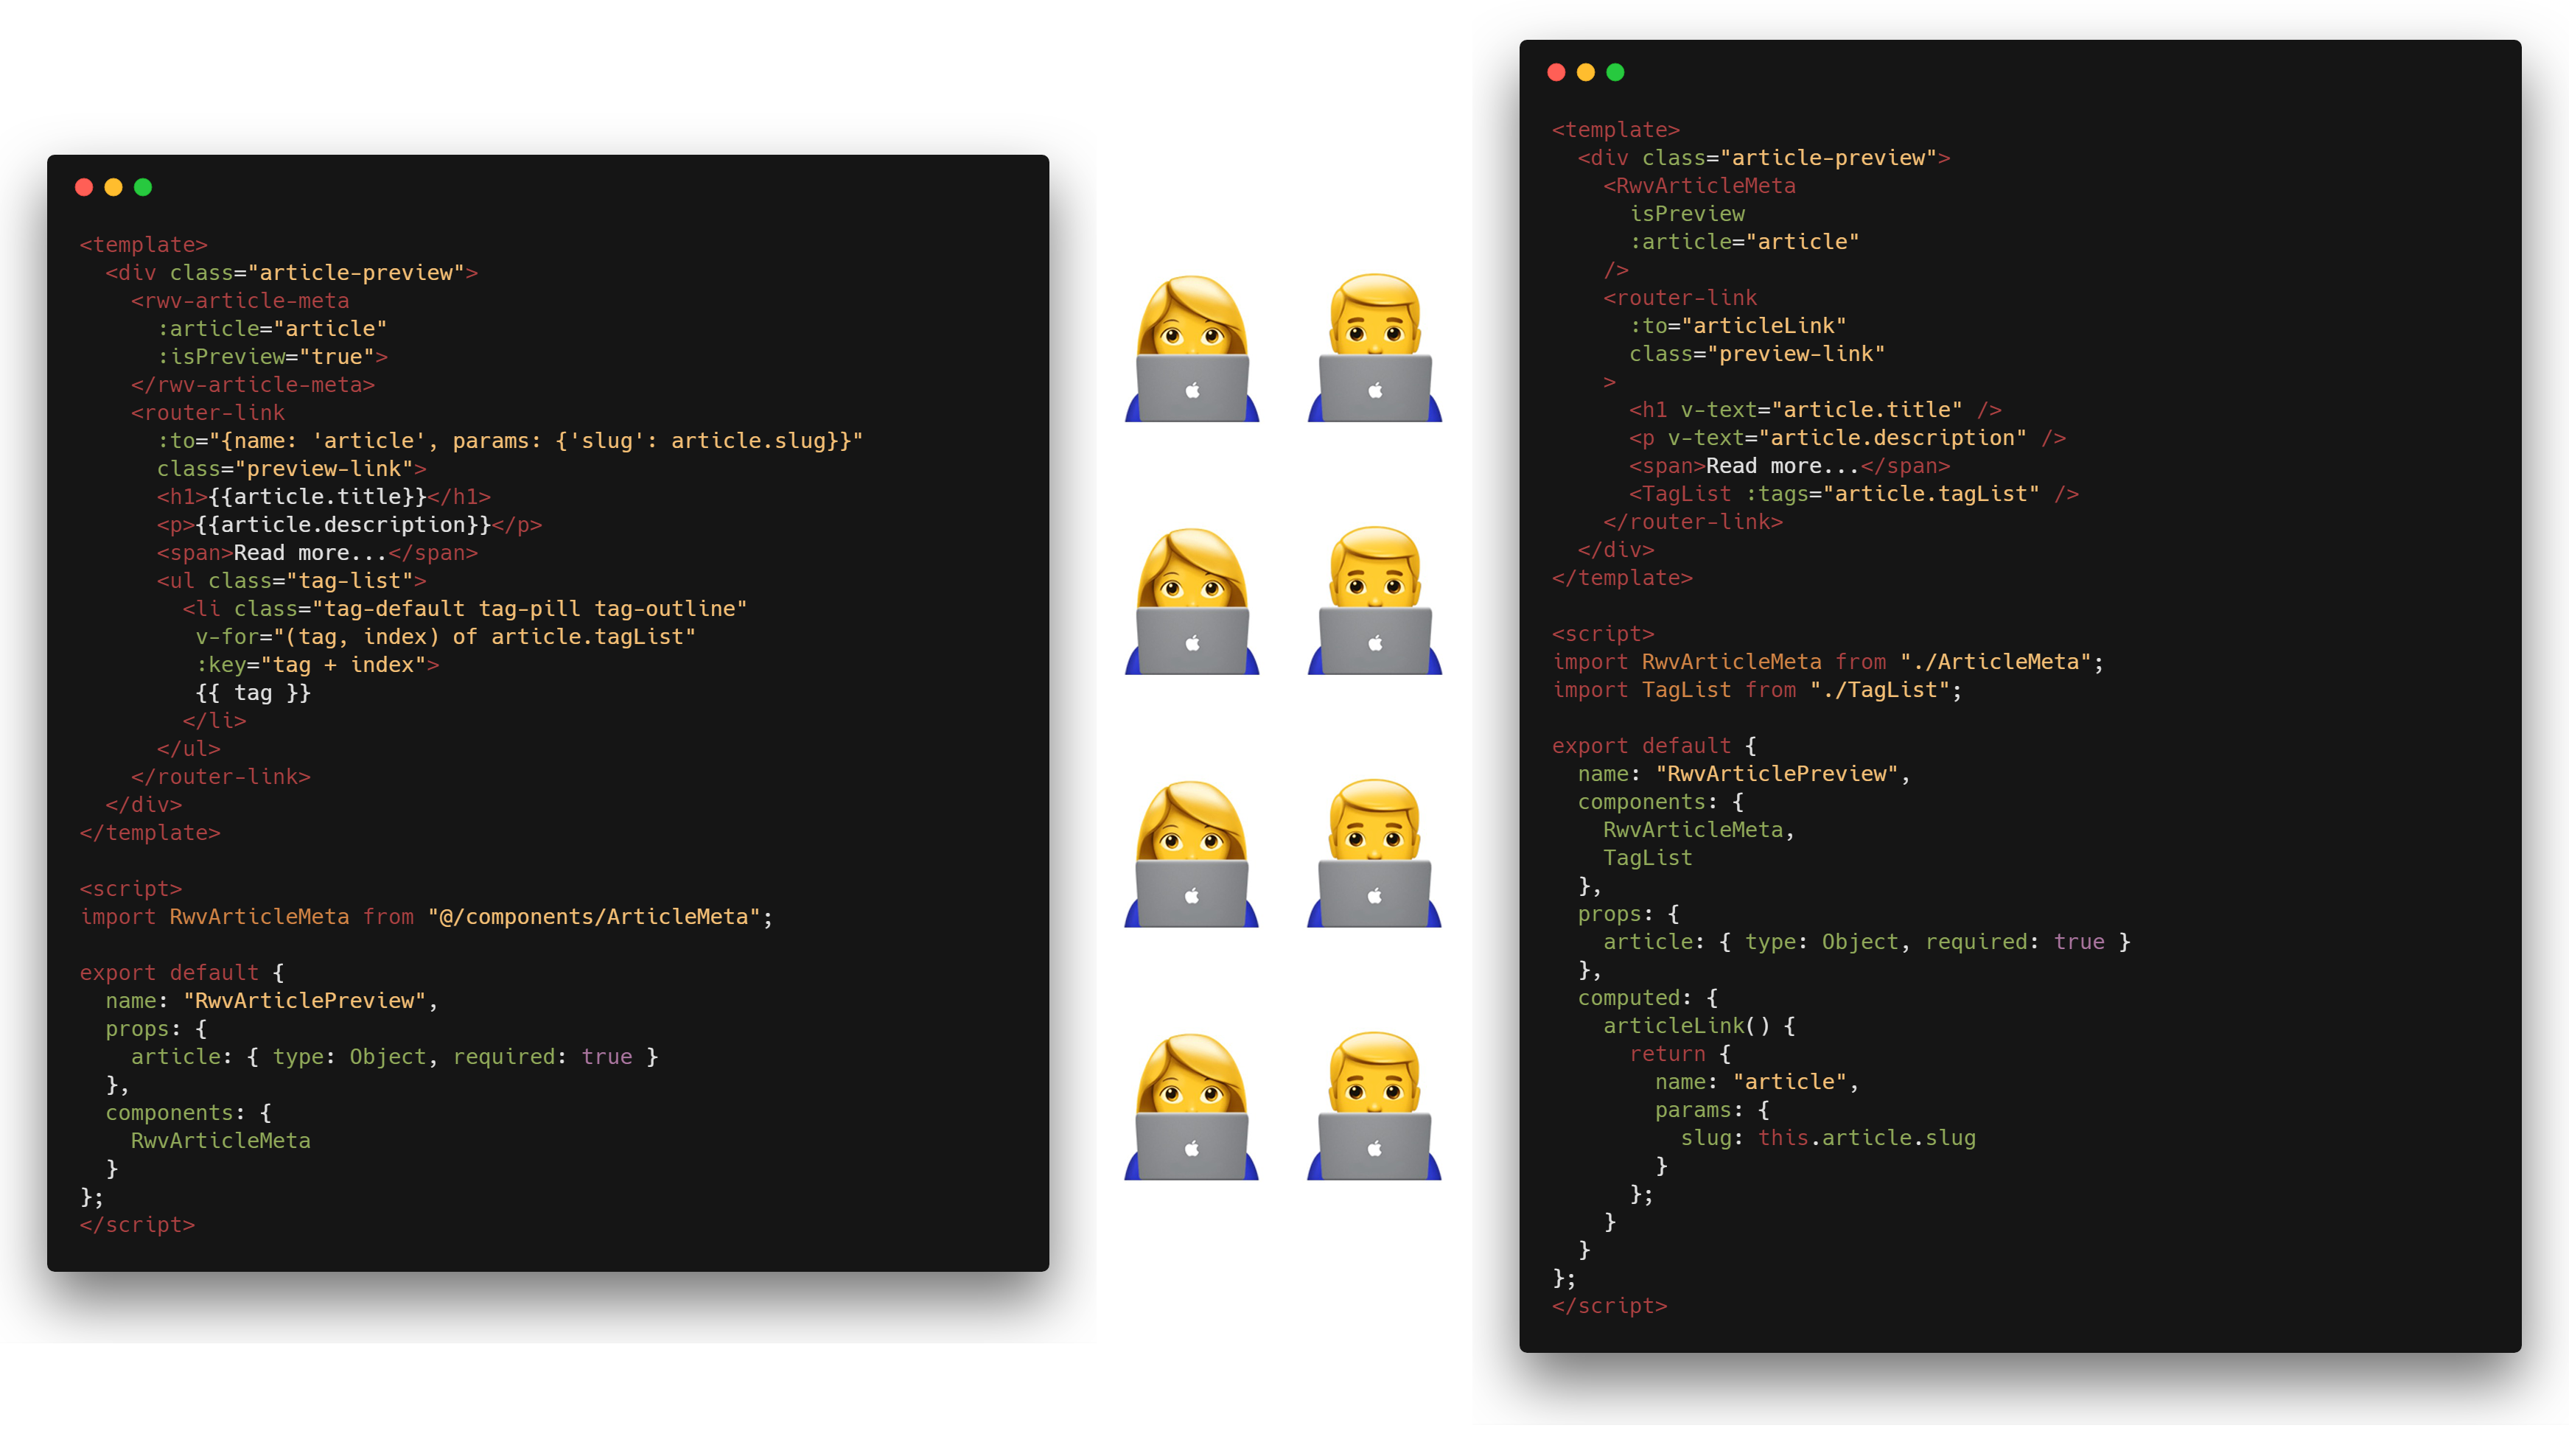
In the end, the component is longer but like I said: The human likes to read from top to bottom. And the average indentation is actually less than before which is a good sign. Especially the template part is now easier to move around which gives a lot of extension and refactoring power because these type of feature requests are more common than changing something existing in the component. The script part is also longer but easier to edit and extend which is also really good.
After all, a refactoring should aim for later use. For you, for your team or for whoever is going to extend functionality in your component or might want to change the behavior. In this example, we have increased this factor of customization a lot.
If you want to try those patterns yourself, please do so. Read through the Vue.js Style Guide which enforces most of those patterns listed here. You can also start to contribute to the vue-realworld-example-app by sending Pull Requests for refactorings. I would really like to get more contributions to this project, even by beginners because this is also how I started with Vue.js more or less.
Thanks for reading this. You rock 🤘 If you have any feedback or want to add something to this article just comment here. You can also follow me on twitter or visit my personal site to stay up-to-date with my blog articles and many more things.
You might also like
Auto formatters for Python
🔥Save time by using the best auto formatters for python - a comparison to find the best for Python 2 and Python 3
Vue.js review of 2017
Vue.js had amazing growth throughout 2017, after the release of version 2 of the framework in 2016 the ecosystem grew drastically. This and more in Vue.js in 2017 is covered here.