written on 07/15/2017
Unit testing Vue.js components with Jest
Foreword: I integrated all the new JavaScript stuff into a legacy application. Because of this reason and that the old JavaScript was horrible and not tested, I decided to set things up right this time. So that this JavaScript hell I worked with will never exist anymore (or at least will not exist in future iterations).
You probably heard about the article Jest for all: Episode 1 — Vue.js by Cristian Carlesso, but in my opinion some stuff is unnecessary for unit testing. So let’s start with the basics. Also, he is focusing a lot on snapshot testing.
We will create a new Vue.js project with the webpack template on GitHub. We need to set up the project. But this time we will add nothing to the tests. So let’s do this with a new project:
1$ npm install -g vue-cli2$ vue init webpack vue-jest
We also need to setup some stuff in this template. See my option table to see what I have set to the prompts. You definitely should not install Karma + Mocha and Nightwatch.
| Option | Selection |
|---|---|
| Project name | vue-jest |
| Project description | A Vue.js project |
| Author | Kevin Peters youremail@email.com |
| Vue build | standalone |
| Install vue-router? | Yes |
| Use ESLint to lint your code? | Yes |
| Pick an ESLint preset | Airbnb |
| Setup unit tests with Karma + Mocha? | No |
| Setup e2e tests with Nightwatch? | No |
Now we can switch to our freshly created project and see if everything is working. But after switching to the project we need to install the dependencies first.
1$ cd vue-jest2$ yarn install # you can also use npm with: npm install3$ yarn run dev # you can also use npm with: npm run dev
Now we have a fresh project without any testing utility. Let’s start adding the dependencies. We need several dependencies to test with Jest since it is normally just testing JavaScript files. So we need to tell it how to handle Vue.js Single File Components. But first lets install all dependencies. You can install those libraries via yarn or npm with this command:
1$ yarn add -D jest jest-vue-preprocessor babel-jest jsdom vue-server-renderer2# Or you use npm3$ npm install --save-dev jest jest-vue-preprocessor babel-jest jsdom vue-server-renderer
After we have installed all dependencies we can start with the real stuff. First of all we should change the Hello.vue component. We define three new styles of the component. Those three classes will be used for the heading element based on what the data item is set to. Instead of just having a ‘msg’ inside the data of the component we also will have a boolean ‘isCrazy’. Besides that, we will also have a method to toggle this boolean to test more of our component. We also strip down our template inside the component since we do not need that much information on it.
1<template>2<div class="hello">3<h1 :class="headingClasses">{{ msg }}</h1>4</div>5</template>67<script>8export default {9name: "hello",10computed: {11headingClasses: function getHeadingClasses() {12return {13red: this.isCrazy,14blue: !this.isCrazy,15shadow: this.isCrazy,16};17},18},19data() {20return {21msg: "Welcome to Your Vue.js App",22isCrazy: false,23};24},25methods: {26toggleClass() {27this.isCrazy = !this.isCrazy;28},29},30};31</script>3233<style scoped>34.red {35color: red;36}37.blue {38color: blue;39}40.shadow {41box-shadow: 5px 5px 5px 5px rgba(0, 0, 0, 0.2);42}43</style>
Next we need to adjust our ‘package.json’. First of all we should add a new npm task. These npm tasks become really helpful and can be defined really easily. After you have installed Jest it will generate a binary locally in your project which you can access under ‘./node_modules/.bin/jest’. Your scripts key in the package.json should look like:
1"scripts": {2"dev": "node build/dev-server.js",3"start": "node build/dev-server.js",4"build": "node build/build.js",5"lint": "eslint --ext .js,.vue src",6"test": "./node_modules/.bin/jest"7}
Now we can really start writing tests. Yay 👌
Create a new directory in the project called test. In this project our tests will stay. Add a new file and call it Hello.test.js. This will test our Hello.vue Single File Component. In the test we need to import different Modules. After trying to import Vue.js you will probably get some ESLint errors. We can adjust this by overriding the default configuration. Under the test directory, create a file called .eslintrc.js. In this file we will try to add unknown keywords which are provided by Jest and override some settings.
1module.exports = {2extends: "airbnb-base",3globals: {4jest: true,5expect: true,6mockFn: true,7config: true,8afterEach: true,9beforeEach: true,10describe: true,11it: true,12runs: true,13waitsFor: true,14pit: true,15require: true,16xdescribe: true,17xit: true,18},19};
This will override the eslint rules for this directory and add some globals needed for Jest testing.
1import Vue from "vue";2import jsdom from "jsdom";3import HelloComponent from "../src/components/Hello.vue";45const renderer = require("vue-server-renderer").createRenderer();67describe("Test suite for HelloComponent", () => {8it("Test data msg", () => {9const ClonedComponent = Vue.extend(HelloComponent);10const NewComponent = new ClonedComponent({11data() {12return {13msg: "I am a cool message",14};15},16}).$mount();17renderer.renderToString(NewComponent, (err, str) => {18const dom = new jsdom.JSDOM(str);19const firstHeading = dom.window.document.querySelector("h1");20expect(firstHeading.textContent).toContain("I am a cool message");21});22});23});
To start, we need to import the modules vue, jsdom and our Hello.vue component. After importing these we also need to require the vue-server-renderer and use it as constructor function for a simple renderer. After this setup we can actually start writing our test. We will start by defining a ‘describe’ function which is there for the unit test context. Just put a string as first parameter like ‘Test suite for HelloComponent’. The second parameter is a function in which different test cases will be executed. Test cases are created by calling the function ‘it’ with two parameters: the first one is the name of the test, the second one is again a function. Inside the function we will extend the HelloComponent with the Vue.js utilities. This will basically create a new component constructor which we can use to mock data. After creating it and mocking data we need to mount the component.
Now comes the interesting part. We could probably test the component here in a simple way, but I do not like this approach. Let’s use the vue-server-renderer to render the component to a HTML string and check different properties with jsdom inside it. Inside the render function callback we will get the string of the HTML representation we can use in jsdom to get a real DOM element inside a Node.js environment and can test it like a real DOM element. Inside the example I will mock the msg data string to ‘I am a cool message’ and will check if the textContent of the element inside the template contains this text since it should render it right. Now if you try to run the tests via
1$ yarn test2# or npm3$ npm test
You will get some errors.
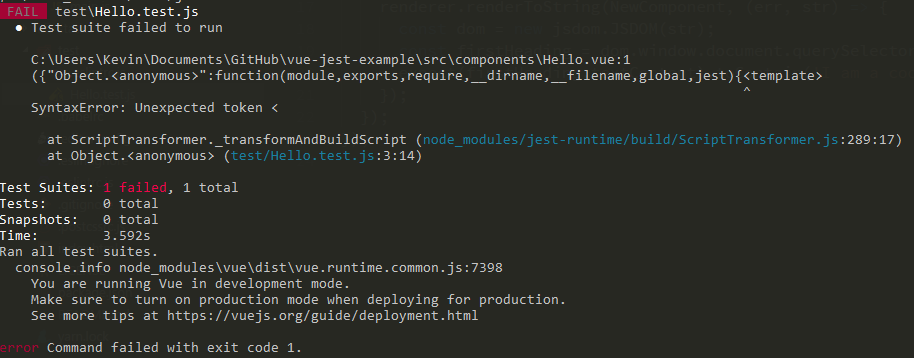
This is because Jest cannot compile Vue.js files to JavaScript by default. Inside the ‘package.json we need to add some Jest options. This can be done by adding a new key ‘jest’ to the configuration file. Inside this object we will add the transform key which also takes an object as value. Inside this value we will have regex patterns and pre processors for the different file types. For example , our pre processors would look like:
1{2//...3"jest": {4"transform": {5"^.+\\.js$": "<rootDir>/node_modules/babel-jest",6".*\\.(vue)$": "<rootDir>/node_modules/jest-vue-preprocessor"7}8}9// ...10}
After adding this our test should run very smoothly. We can also test the coverage of our tested files by using the coverage option by Jest.
1$ yarn test -- --coverage2# or npm3$ npm test -- --coverage
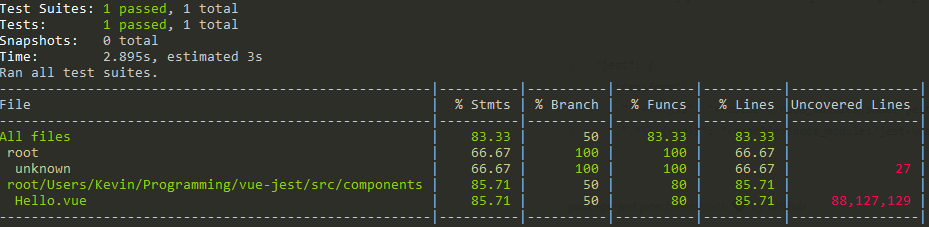
This will result in something like this. Probably really useful for some old enterprise companies which require >90% test coverage 👔.
I should probably also mention the watch mode by Jest. Instead of ‘coverage’ use ‘watch’ to run tests every time your code changed. Jest is so clever it will just run the tests affected by the changes. Probably really cool for running in a development environment.
Anyway, we can do a lot more inside the tests by doing several things. For example, we could check the classes which are toggled by using the method.
1it("Test toggling method", () => {2const ClonedComponent = Vue.extend(HelloComponent);3const NewComponent = new ClonedComponent().$mount();4renderer.renderToString(NewComponent, (err, str) => {5let dom = new jsdom.JSDOM(str);6let firstHeading = dom.window.document.querySelector("h1");7expect(firstHeading.classList.length).toBe(1);8expect(firstHeading.classList).toContain("blue");9NewComponent.toggleClass();10renderer.renderToString(NewComponent, (errToggleClass, strToggleClass) => {11// Now the classes should have changed.12dom = new jsdom.JSDOM(strToggleClass);13firstHeading = dom.window.document.querySelector("h1");14expect(firstHeading.classList.length).toBe(2);15expect(firstHeading.classList).toContain("red");16expect(firstHeading.classList).toContain("shadow");17});18});19});
In the default state the HelloComponent will has one class called ‘blue’. After we toggled the class via the method ‘toggleClass()’ the component should have the two classes ‘red’ and ‘shadow’. Probably not a good idea to test the amount of classes since this could change in the future for different visual reasons. But for now its fine.
I hope I could give you a nice start into testing Vue.js with Jest. Definitely look into the Options/Data section of the Vue.js documentation to find more about mocking up data. And probably instead of the custom build with vue-server-renderer and jsdom you should look into eddyerburgh/avoriaz or the upcoming vue-test-utils.
You can find the full code in the repository: igeligel/vue-jest-example
You might also like
Vue.js review of 2017
Vue.js had amazing growth throughout 2017, after the release of version 2 of the framework in 2016 the ecosystem grew drastically. This and more in Vue.js in 2017 is covered here.
Auto formatters for Python
🔥Save time by using the best auto formatters for python - a comparison to find the best for Python 2 and Python 3